December 17, 2015 7:15 am
Published by Kirsty Sharman
This blog post was originally written by Ruan Fourie.
A lot of Influencers see their blog as a center point for all their Influecner Channels. Brands love Influencers with blogs, and that is why this step-by-step post is all about conneting your blog to your Webfluential profile.
Connecting your blog to your Webfluential profile can be done in three simple steps and it does not take more than 5 minutes to set up, so let's jump right into it.
If you have not applied to be a Webfluential Influencer yet, you can apply by simply clicking the button below.

Step 1: Select the profile that you want to connect the blog to
Simply
login to your Webfluential account and from your Dashboard you can select the profile that you want to connect the blog to. Most Influecners only have one profile, but you can have multiple profiles that each have their own blog and social accounts. For this reason it is important to select the relevant profile that you want to connect your blog to.
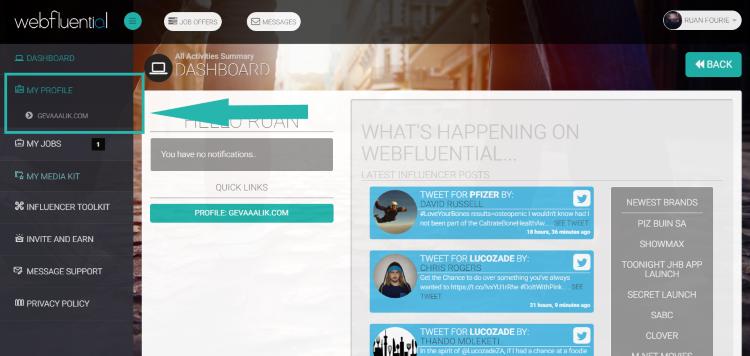
To get to your profiles, simply click the "My Profile" section in the right hand side menu bar on your Dashboard, your profiles will then drop down and you can simply select the relevant profile that you want to connect a blog to.
Step 2: Add a blog
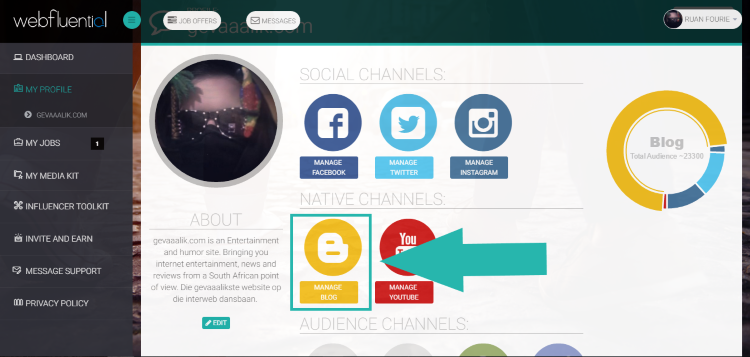
When you get to your profile page simply click the "+ Add Blog" Button. The button in indicated in the image below. If you have never added a blog to your profile, the button will be grey in colour. If you have however added a blog to your profile before, the button will be yellow in colour like in the image below and it will say "Manage Blog".
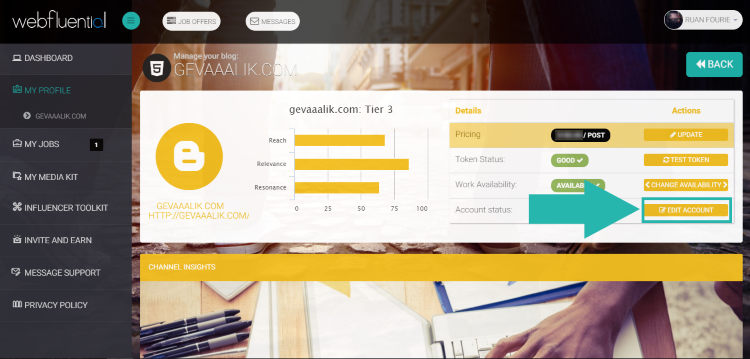
If you have added a blog in the past and the button is yellow as in the image above, you will see the next screen before you can get to step 3. Once you've clicked "Manage Blog" button you will see the screen in the image below. Simply click "Edit Account" to change or update the blog you have added to the profile in the past. If you have never added a blog to your profile before, you will be taken directly to the screen in Step 3.
Step 3: Tell Webfluential where to find your blog
Step 3 is where you tell Webfluential where to find your blog. Simply enter the name of your blog and a short description in the two fields supplied. When you past the URL (web address) of your blog make sure that you use the correct URL. The easiest way to do this is to simply go to your blog via your internet browser and then you can copy the URL from the address bar of your internet browser.
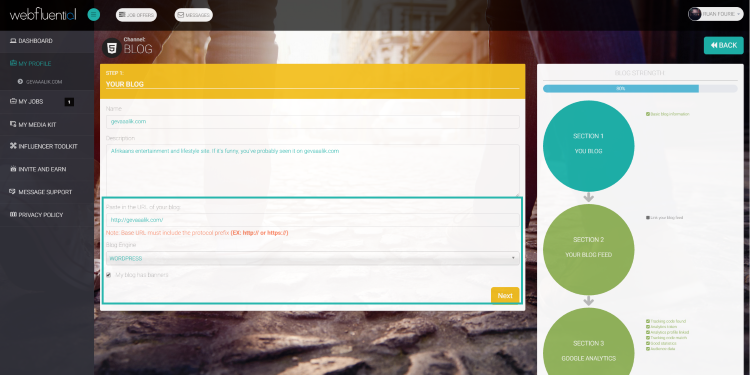
We have noticed that a lot of Influencers add the www. subdomain of their blog when that is not the URL of their blog. For example http://www.myexampleblog.com/ instead of http://myexampleblog.com/. If you copy and paste the URL direct from your browser address bar, this common mistake can easily be avoided.
Step 4: Connecting your blog RSS Feed URL
Connecting your blog RSS feed is important so that the Webfluential Platform can see when you have completed jobs on your blog. We are still working on some minor bugs at the moment that have been stopping some RSS Feeds from connecting. Not to worry, we are working on it and you can still connect your blog to your Webfluential profile even without the RSS feed.
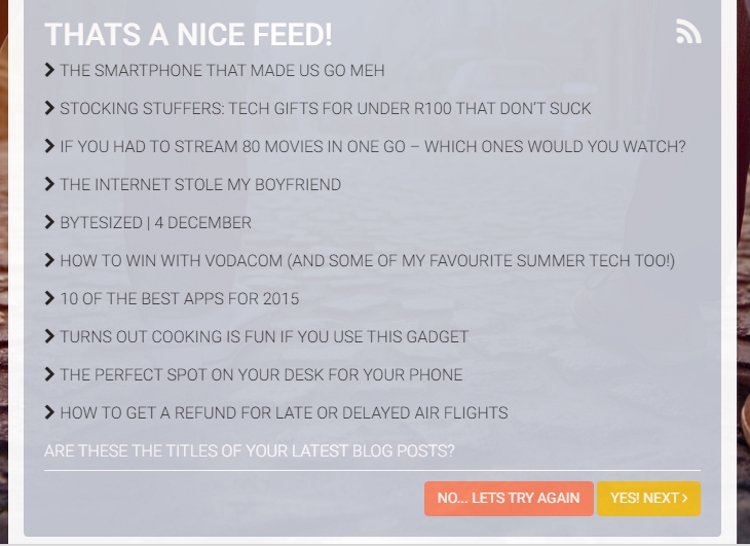
When you have correctly entered your blog URL in step 3, your RSS Feed address should appear automatically and you can connect the RSS feed of your blog to your Webfluebtial profile. If successful you will see the titles of your latest blog posts like in the image below. Once again, if you get the "Nope"message while trying to connect your RSS feed, don't worry, we are working on the solution and you can simply continue to the next step. Not connecting your RSS feed will not affect your ability to get jobs.
Step 5: Connecting your Google Analytics Account
Google Analytics is the globally accepted standard for keeping track of traffic to a website. That is why most marketers will request to see the Google Analytics data for your blog when they are thinking of including you in an Influencer Marketing campaign. This is also the reason why we connect your Webfluential account to your blog's Google Analytics data, to accurately score your blog and suggest how much you should be charging for a blog post.
To connect your Webfluential profile to the Google Analytics data make sure that you are logged in to the Google Account that has administrative access to the Google Analytics profile of your blog.
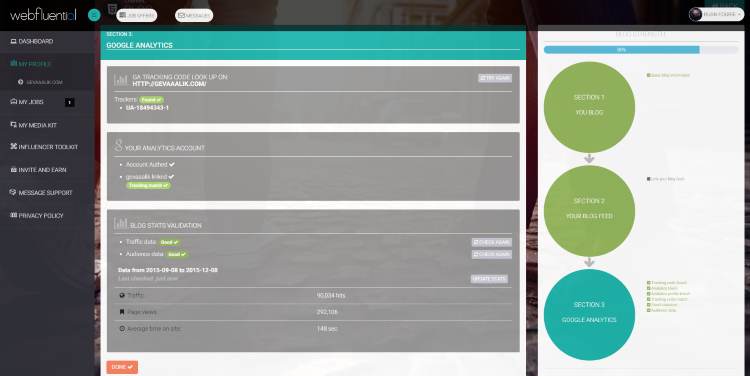
To do this simply log out of all Google accounts and then start the authentication process from section three of the blog connection process, like in the image below. First you authenticate the correct Google Account, then you simply select the correct Google Analytics tracking code and within 24 hours your traffic data will be availible for you to see via your Webfluential profile.
To complete this step you will have to have a Google Analytics tracking code installed on your blog. If you are running a WordPress site, it will have to be a self-hosted site before you can have Google Analytics on your site. THis means that you can not have Google Analytics on a WordPress site like http://myexampleblog.wordpress.com/.
You also need to have more than 50 unique visitors a month to your site before Webfluential will display any Google Anaytics data to you when you are logged into your Webfluential account.
Your blog is connected to your Webfluential Profile
Once your blog has been connected you will be able to set the price for a sponsored blog post on your blog and marketers will be able to find your profile via searches on Webfluential platform so that they can include you in Influencer Marketing campaigns. If selected for a campaign you will receive a job offer that you can accept or decline at your own discretion. Your Webfluential profile is the easiest way for brands to find Influencers like you.

 To get to your profiles, simply click the "My Profile" section in the right hand side menu bar on your Dashboard, your profiles will then drop down and you can simply select the relevant profile that you want to connect a blog to.
 If you have added a blog in the past and the button is yellow as in the image above, you will see the next screen before you can get to step 3. Once you've clicked "Manage Blog" button you will see the screen in the image below. Simply click "Edit Account" to change or update the blog you have added to the profile in the past. If you have never added a blog to your profile before, you will be taken directly to the screen in Step 3.

 We have noticed that a lot of Influencers add the www. subdomain of their blog when that is not the URL of their blog. For example http://www.myexampleblog.com/ instead of http://myexampleblog.com/. If you copy and paste the URL direct from your browser address bar, this common mistake can easily be avoided.

 To complete this step you will have to have a Google Analytics tracking code installed on your blog. If you are running a WordPress site, it will have to be a self-hosted site before you can have Google Analytics on your site. THis means that you can not have Google Analytics on a WordPress site like http://myexampleblog.wordpress.com/.
You also need to have more than 50 unique visitors a month to your site before Webfluential will display any Google Anaytics data to you when you are logged into your Webfluential account.


